Thursday, November 14, 2013

CRAFTS: Mosaic Wall Art


I've just finished another Mosaic piece …. I call it my "Barrier Reef". I love how it turned out and have decided it will go to one of my hubs sisters for Christmas. This sister lives in a seaside suburb and very close to a beach. She loves all things "fish".

Here it is - balanced in the garden prior to grouting.


All finished and in the process of drying. I think it will look great on the wall of sister-in-laws patio.


This is one that I did for a wall in my outdoor patio some time ago. It was kind of "medusa inspired" but without the snakes!


Saturday, November 9, 2013

CRAFTS: Rag Doll Rehab


Over the last 6-8 months I have "rehab-ed" 3 Rag Dolls that belong to the Education Department (School library section) in the South Australian Government. My sister works there and she saw how the three dolls had seen better days.

 Let's call her "Purple"!

My sister had already bought Purple "new" clothes from the op-shop, and did some sponge bathing of the face, feet and hands. Purple needed immediate attention to her posture (stuffing) and her face and hair.

She had just sparse hair on the top and a line of hair down the back centre of her head.


After taking a sample of her hair wool shopping with me, I found wool that was fairly identical and cut lengths along my desk. Two pieces of tape kept everything kind of together and ordered.

I then pinned the wool inside a folded over piece of tissue paper, and marked a dotted line where I was going to run the sewing machine.


Sewed from one end to the other. Then tore away the paper carefully.


I then hand sewed the stitched line of wool down the side of her face. I also stitched down some of the wool that existed on the top of her head - to give her a permanent fringe and to cover bald spots.


I opened her up via the back seam and stuffed more wadding into her face, neck, shoulders and torso. She will now be able to sit up herself and hold her head up too.


Now for Purple's face. I removed her eyes and mouth, and left her eyebrows and nose.


Out of white and black felt I cut out new eyes and glued them on using a strong craft glue.


Every girl needs a little red mouth that is demure! Red felt came in handy and several go's with scissors formed the perfect pout!


To finish her hair - It was such a lovely length that I decided Purple needed plaits. When the plaits looked even I trimmed the ends to tidy her up.


She even scored a pretty pink glitter bow!


FINISHED!! Purple is all ready to face the outside world and be loaned to teachers to "help" with the Education of little people!!

I'm sure she feels like she can take on anything now!


Tuesday, August 27, 2013

COOKING: (Microwave) Chocolate Salted Caramel Mug Cakes

It's been so long since I've put up a recipe, and I'm sorry about that. Last night I had my brother and his two mini-schnauzers over for the afternoon and evening..... so I always make a nice dinner and a dessert. Normally this is the only sweet course we have over the week because I'm always trying to reduce my ever expanding body!! But, everything in moderation remember.


Chocolate Salted Caramel Mug Cakes 
(Source: Super Food Ideas Magazine, August 2013


You will enjoy this one. I found the recipe in my monthly foodie magazine that I subscribe to. "My" only change was to sprinkle a few choocy chips on the top, a couple of times..... you will agree with me.

It was dead easy and worked a treat. This recipe makes FOUR.

The ingredients are:

1/2 cup self-raising flour
1/2 cup caster sugar
1/3 cup cocoa powder, sifted
1 egg
1/2 cup milk
1 and a half Tbspns vegetable oil
1 teaspoon pink salt flakes
6 jersey caramels, quartered
2 Tbspns dark chocolate chips/bits

Whipped cream to serve

Aprons on.... here we go:


Get the Jersey Caramels out, open the packet and eat one or two to check they are OK. If they are, quarter 6 with a sharp knife and hide the rest of the packet from the family.


Combine the flour, sugar and cocoa (you MUST sift the cocoa it always has little lumps) and whisk through. I used a big pyrex jug that had a pouring spout because I thought it was a genius idea!


Add in the egg, oil and milk...


And whisk for 30 seconds till it's like thickish pancake batter consistency.


Pour into your chosen mug or ramekin (this is where the pouring spout was genius!)


Pop all four into the microwave (recipe is based on a 1100watt microwave) and cook on high for 1 minute - the above picture is what they will look like.


Put on pieces of your quartered caramel, a little sprinkle of salt and a little sprinkle of choc chips.


Back into the microwave for another minute then this is what they will look like.


Put another 3 pieces, salt and chips on, and microwave for 2 minutes. All done!


Serve with whipped cream and watch the chocoholics squirm with joy and then do their Happy Food Dances!

I will definitely make these again.

Tuesday, July 9, 2013

FREEDOM: Dinner for my husband's Birthday.

My husband celebrated a significant Birthday mile stone yesterday - so I organised a small celebration at a beautiful restaurant on the Torrens River just out of Adelaide's CBD. The Red Ochre Restaurant is famous for it's inventive use of Australian ingredients including very unknown "bush food" morsels which normally are not readily available in a supermarket.

Over ten years ago my brother and I took a Canadian cousin and husband out for a meal and we ended up choosing this restaurant - and we had a fabulous night then too. We took the tack of choosing almost every entree and shared each plate so a full taste experience was had. I can honestly say - the Canadians were blown away by "Aussie fare". They had assumed that Australian food is what they got served up at "Outback Jacks" ....... no...no ..... nooooooo!!

Back to last night..... here are some pictures to make you hungry!


 The exterior - Our restaurant was upstairs and there is a separate one downstairs.


 Walking up.


 Looking at the City Scape on the river over the balcony tables. Too cold to sit outside in winter!


 Tasting plate contained Crocodile fish cake with lemon myrtle pickle, potato and leak soup with pepper leaf chive cream, and goats curd noisette with liquid beetroot.


 Husband had the Char Grilled Kangaroo


 My choice was asian inspired Clay Pot Duck.....


 The duck dish was then spooned over my steamed bok choy and coconut and lemongrass rice. The rice was to die for!!!


 This was the organic prosciutto wrapped chicken, soft herb stuffing, confit leg, sweet potato, toasted cashews, spinach puree, cranberry and native apple pickle.


 Salt bush lamb


 Yam Gratin side dish


 My dessert..... Wow! Macadamia and honey parfait, salted caramel popcorn, and chocolate ganache.


Trio of brûlées - chocolate, plum and lime and ginger.


Sunday, June 30, 2013

CRAFTS: Mosaic Garden Ball

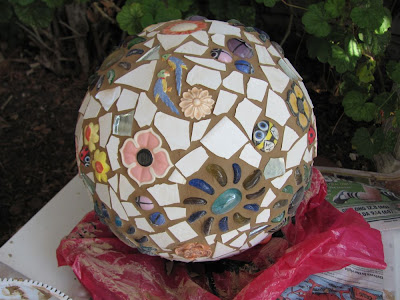
The Mosaic Garden Ball


I had this vision for the longest time - of a permanent garden decoration in the shape of a ball that I could mosaic. I had started to look high and low for something suitable..... and was trying not to buy a solid concrete thing..... but really I needed something very sturdy for the purpose.

A venture into my local "pots and plants" shop gave me the "jack-pot" amongst the Bargain Corner items .... (where the chipped and unloved stuff end up) ....I spotted two concrete balls that were supposed to be part of a water feature... but something had happened to the pedestals! Before you could say Rumplestiltskin..... they were in the back of my car (yes - I did pay for them first) and I was happily driving them home.

My sister is heavily involved in garden clubs and such. She had been on a tour of gardens interstate where the group were taken to a garden which was heavily studded with interesting garden ornaments that were mosaic'd - and she said to me that it really struck her at how lovely it looked.

So this was an invitation to stud her garden! And an opening for homemade Birthday and Christmas gifts for the future.

Here it is sitting on a tray filled with sand, then the tray is slipped into a plastic bag. This gives a nice surface to work on.


I wanted to give the ball a strong base - sort of like built in legs so I applied a heavy layer of adhesive 


And glued in four flattish river stones. This should elevate the ball slightly to allow water and moisture to run off and not soak the base of the ball.


I stuck on a combination of glass beads and assorted ceramic items.


Someone was fascinated with the project!


I then had to move it inside because of the cold winds outside. I decided to use white tiles as the background as I have a healthy supply thanks to my brother's bathroom renovation. For some extra bling I stuck on random pieces of mirror as well. 


Finally - all covered.


Outside again after a drying time of two days. Now is the grouting. You need a big bucket or tub of water (I use an old kitchen bin) and fill it with rain water.


Get your grout powder and some water - then mix the grout with the water until it is thick.


The right thickness is important - you need to be able to put a big blob on the end of your spatula and it needs to hold its shape and resist coming off the spatula. I suppose this is like bricklayer's mortar.


With a dry sponge I squish it into all gaps really really thoroughly - allow to dry for about 5 minutes - then begin to carefully wipe it over and over with a damp sponge to clean off excess. This is where the big tub of water comes into play.

Sorry to have no photos of this process - but handling wet grout and wet sponges and a camera is not possible!


I did the bottom half first..... then came back after an hour or so and grouted the top half.


It's messy and I don't enjoy grouting much - but you get there in the end. The trick is to allow the grout to dry enough so it stays in the cracks..... but is wet enough to wipe off the pieces in the project. You must be very careful not to wipe too much out from between the pieces. The grout here is still drying and looks darker than the finished and dry product.


Here it is - temporarily in my garden - ready to transfer into my sister's garden on Wednesday. (Thank goodness for strong husbands!)


Happy Birthday Sis!