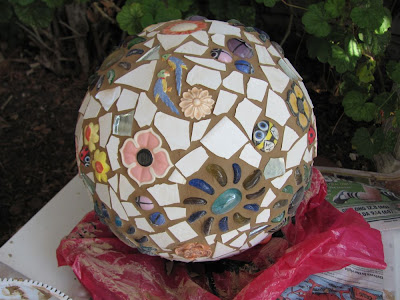
The Mosaic Garden Ball
I had this vision for the longest time - of a permanent garden decoration in the shape of a ball that I could mosaic. I had started to look high and low for something suitable..... and was trying not to buy a solid concrete thing..... but really I needed something very sturdy for the purpose.
A venture into my local "pots and plants" shop gave me the "jack-pot" amongst the Bargain Corner items .... (where the chipped and unloved stuff end up) ....I spotted two concrete balls that were supposed to be part of a water feature... but something had happened to the pedestals! Before you could say Rumplestiltskin..... they were in the back of my car (yes - I did pay for them first) and I was happily driving them home.
My sister is heavily involved in garden clubs and such. She had been on a tour of gardens interstate where the group were taken to a garden which was heavily studded with interesting garden ornaments that were mosaic'd - and she said to me that it really struck her at how lovely it looked.
So this was an invitation to stud her garden! And an opening for homemade Birthday and Christmas gifts for the future.
Here it is sitting on a tray filled with sand, then the tray is slipped into a plastic bag. This gives a nice surface to work on.
I wanted to give the ball a strong base - sort of like built in legs so I applied a heavy layer of adhesive
And glued in four flattish river stones. This should elevate the ball slightly to allow water and moisture to run off and not soak the base of the ball.
I stuck on a combination of glass beads and assorted ceramic items.
Someone was fascinated with the project!
I then had to move it inside because of the cold winds outside. I decided to use white tiles as the background as I have a healthy supply thanks to my brother's bathroom renovation. For some extra bling I stuck on random pieces of mirror as well.
Finally - all covered.
Outside again after a drying time of two days. Now is the grouting. You need a big bucket or tub of water (I use an old kitchen bin) and fill it with rain water.
Get your grout powder and some water - then mix the grout with the water until it is thick.
The right thickness is important - you need to be able to put a big blob on the end of your spatula and it needs to hold its shape and resist coming off the spatula. I suppose this is like bricklayer's mortar.
With a dry sponge I squish it into all gaps really really thoroughly - allow to dry for about 5 minutes - then begin to carefully wipe it over and over with a damp sponge to clean off excess. This is where the big tub of water comes into play.
Sorry to have no photos of this process - but handling wet grout and wet sponges and a camera is not possible!
I did the bottom half first..... then came back after an hour or so and grouted the top half.
It's messy and I don't enjoy grouting much - but you get there in the end. The trick is to allow the grout to dry enough so it stays in the cracks..... but is wet enough to wipe off the pieces in the project. You must be very careful not to wipe too much out from between the pieces. The grout here is still drying and looks darker than the finished and dry product.
Here it is - temporarily in my garden - ready to transfer into my sister's garden on Wednesday. (Thank goodness for strong husbands!)
Happy Birthday Sis!


So cool! I love the step-by-step look. Now I want to try mosaic. It amazes me how to you make it up as you go. You are very talented. I imagine your sister is going to flip. Beautiful.
ReplyDeleteGood work you should enter it in the mosaic specialty shop competition
ReplyDeleteSuch a lovely project. Where in the world do you buy the ceramic shapes from? Rubie is a sweetie.
ReplyDeleteHi Heather - thank you for reading my blog. I'm sorry for not getting back to you sooner. I have a friend who is a ceramic artist and she makes the small ceramic embellishments you see on this ball. I've spoken to her about your enquiry, and while she (Sandy) does not usually sell to the public, she will be happy to put together a mixed lot of assorted flowers, birds, bees, bugs etc like what I used on my garden ball. If you are interested, email Sandy on rod(dot)c(at)internode(dot)on(dot)net and she will be happy to discuss it with you. By the way, Sandy and I are in Australia so that may make a difference to you if you are not. Hope I can help!! Regards, Poots.
ReplyDeleteThank you so much for your reply. I will contact Sandy. I am in Oz, Hervey Bay. I haven't been doing mosaic for very long, but am becoming slightly addicted. I'm forever in the op shops looking for things. Again, thanks so much for your reply. Warmest wishes, Heather.
ReplyDelete