Showing posts with label mosaics. Show all posts

Thursday, November 14, 2013

CRAFTS: Mosaic Wall Art


I've just finished another Mosaic piece …. I call it my "Barrier Reef". I love how it turned out and have decided it will go to one of my hubs sisters for Christmas. This sister lives in a seaside suburb and very close to a beach. She loves all things "fish".

Here it is - balanced in the garden prior to grouting.


All finished and in the process of drying. I think it will look great on the wall of sister-in-laws patio.


This is one that I did for a wall in my outdoor patio some time ago. It was kind of "medusa inspired" but without the snakes!


Sunday, June 30, 2013

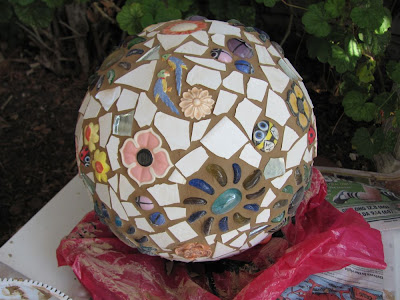
CRAFTS: Mosaic Garden Ball

The Mosaic Garden Ball


I had this vision for the longest time - of a permanent garden decoration in the shape of a ball that I could mosaic. I had started to look high and low for something suitable..... and was trying not to buy a solid concrete thing..... but really I needed something very sturdy for the purpose.

A venture into my local "pots and plants" shop gave me the "jack-pot" amongst the Bargain Corner items .... (where the chipped and unloved stuff end up) ....I spotted two concrete balls that were supposed to be part of a water feature... but something had happened to the pedestals! Before you could say Rumplestiltskin..... they were in the back of my car (yes - I did pay for them first) and I was happily driving them home.

My sister is heavily involved in garden clubs and such. She had been on a tour of gardens interstate where the group were taken to a garden which was heavily studded with interesting garden ornaments that were mosaic'd - and she said to me that it really struck her at how lovely it looked.

So this was an invitation to stud her garden! And an opening for homemade Birthday and Christmas gifts for the future.

Here it is sitting on a tray filled with sand, then the tray is slipped into a plastic bag. This gives a nice surface to work on.


I wanted to give the ball a strong base - sort of like built in legs so I applied a heavy layer of adhesive 


And glued in four flattish river stones. This should elevate the ball slightly to allow water and moisture to run off and not soak the base of the ball.


I stuck on a combination of glass beads and assorted ceramic items.


Someone was fascinated with the project!


I then had to move it inside because of the cold winds outside. I decided to use white tiles as the background as I have a healthy supply thanks to my brother's bathroom renovation. For some extra bling I stuck on random pieces of mirror as well. 


Finally - all covered.


Outside again after a drying time of two days. Now is the grouting. You need a big bucket or tub of water (I use an old kitchen bin) and fill it with rain water.


Get your grout powder and some water - then mix the grout with the water until it is thick.


The right thickness is important - you need to be able to put a big blob on the end of your spatula and it needs to hold its shape and resist coming off the spatula. I suppose this is like bricklayer's mortar.


With a dry sponge I squish it into all gaps really really thoroughly - allow to dry for about 5 minutes - then begin to carefully wipe it over and over with a damp sponge to clean off excess. This is where the big tub of water comes into play.

Sorry to have no photos of this process - but handling wet grout and wet sponges and a camera is not possible!


I did the bottom half first..... then came back after an hour or so and grouted the top half.


It's messy and I don't enjoy grouting much - but you get there in the end. The trick is to allow the grout to dry enough so it stays in the cracks..... but is wet enough to wipe off the pieces in the project. You must be very careful not to wipe too much out from between the pieces. The grout here is still drying and looks darker than the finished and dry product.


Here it is - temporarily in my garden - ready to transfer into my sister's garden on Wednesday. (Thank goodness for strong husbands!)


Happy Birthday Sis!


Wednesday, August 1, 2012

CRAFTS: Rescued Garden Bench and Mosaic House Numbers


I admit it. I look at the stuff people put out on their footpaths after they have booked a "hard refuse" collection by their council. Subtly of course. Most of it is stuff that needs to be thrown away after years of service. It also reminds me that I should be chucking some stuff out too. But I'm a bit of a closet hoarder and secretly hate to part with things.

Me being crafty...... makes my brain look at rubbish with a view of giving it "potential".... improving, restoring and giving the item the ability to shine on in another life. Don't show me old wooden furniture. I'll be ordering my long suffering husband to lug it home for me under the cover of darkness in the evening.

That's what happened to this garden bench. It was painted up in the "folk art" style with ivy leaves along the backrest and a huge rose on the seat..... all flaking and peeling and the bench wobbly and unsafe. Again, stupidly I had not taken a photograph so you can't actually see the state it was in. Duh I'm silly sometimes!

So I can only show you an "after picture". After lots of sanding (me)..... and structural repair and reinforcement (thanks hubby).... and three coats of outdoor furniture stain and varnish (me), here is the finished piece:

Not shabby now.

And the seat even has storage under its hinged lid!

I have to admit....that during the sanding process I am cursing myself for my vision of the end product ..... it is hard work and easy to become unmotivated at that stage. But I'm glad I finished it - and I wonder what the people who threw out this bit of rubbish would think of it now!! Lol!


************************


I recently offered to make a mosaic house number for my husband's daughter who demolished and then built a brand now house on the same plot. Unfortunately her house number is "8" on the street and curvy numbers are a bugger to mosaic...... and "8"s  are  *** ALL CURVES!!***

Anyway, I had already offered so it had to be. The step daughter wanted something very plain..... so here it is:

 Dainty and Plain.


Thank goodness I found these wonderful "jelly bean" shaped glass beads...... my solution to "curvy" problems!


Husband hung it up on the house.


And it looks good. Many people have complimented the home owner on it    :-)


Then my sister had a birthday...... and guess what - I decided to mosaic a house number for her. 

You wouldn't read about it......

Her house is NUMBER 8 too!!!! Grrrrrrrr!!!!!!


I thought browns and greens would compliment the browns of her house.


I think it compliments the lovely brick pattern really nicely.

She was delighted. I would be too.

Now - NO MORE "8"'s PLEASE!!!!


Tuesday, May 22, 2012

CRAFTS: Mosaic Beginning and First Projects


A couple of years ago my good friend Lynn talked me into going to a mosaics class with her. I figured "why not?" - I'm crafty......let's see if I can do this!

Needless to say that it has been a gift to get into this craft. I always assumed it was going to be tough to cut things like tiles and glass..... and it is unless you know how. Even when you know how it can still go wrong.... but it is nothing you can't fix!

I got along really well with Sally, the lady who owns the Mosaic Shop and runs all the classes. She was looking for someone to look after the shop for her when she is at buying trips or conferences etc., and I offered. So we have an arrangement than she can call on me when she needs help.

Here are some shots of the shop. They are taken a couple of years ago and to see the shop now it is much different. Sally has really stuffed as much stock as she can in there, there is no room on the walls and there are many more shelving units heaving with mosaic items and giftware for sale.

Can you see Kayla..... the shops little mascot?? Look on the floor.


This large table in the middle is where the classes are done.


We loved this pink flamingo made by Sally - it is display only and Sally doesn't want to sell it.


This was my very first project EVER in mosaics. I decided to do a small outdoor table with water lilies.


Sally suggested I dot my table top with mirror. That was a challenge to cut!


Lily pads being done and glued.


Background taking shape. These white tiles were leftover from my brother's bathroom renovation. Waste not, want not in the mosaic world!


I bought three little fish to "swim through" the middle of the table.


All finished and grouted in a light grey colour. The grout is darker in patches as it is still drying but I couldn't wait to take the pics! 


Next to a chair for scale. This is now outside under my gazebo with two outdoor chairs around it.

I was thrilled with the outcome.


My next project was a "random" terracotta pot.

Finished and grouted. Used a terracotta colour grout and that worked well I thought.

I ended up selling this in Sally's shop. Someone else has my work in their backyard!


Sunday, February 26, 2012

CRAFTS: Antique wash stand Restoration inc. Mosaics

I have been known to "save" the odd piece of furniture from a "certain death" from time to time. I tend to see the beauty within, and small pieces can often be squeezed into an already bulging house - if you get creative about it!!

I remember my first marble top washstand I restored.....my parents bought it for me after I spotted it in a second hand store. They looked at it, then looked at me as if I had completely lost my mind. They could not see any beauty. I'll show you that one later.

This one was broken and forgotten and dug out of my husband's father's garage when both parents had passed away and we had to clear the house for sale. No-one gave it a second look, and I snapped it up greedily! Initially I restored it for my husband's niece, and therefore it became off-white. If I restored it for me - I would have stripped it to bare wood, then stained and varnished it to a baltic colour. After a time - the niece changed her mind over her decor - so the stand is still with me.


The first pictures I remembered to take. I had already started the sand/strip down of the top.


This is more indicative of the condition - snapped bottom shelf and paint that had seen bad times and years neglected and unwanted in a garage.


 All the sanding and stripping had taken place, and three coats of a light cream acrylic paint had been applied. I'm still wondering what to do with the inset feature of the door, and had started the mosaics on the top.


My mosaics shop (the one I had lessons with and later did some shop-minding duties in) had these beautiful ceramic hand painted tiles for $5 each. I jumped at the Iris, then found it was perfect for this project. Mosaic surround is taking shape.


And now finished and ready for grouting.


 Taaaa Daaaaa! Finished. Finishing and then looking at the piece FINISHED is always a euphoric moment. It's "my high" without any chemicals!


Grouted and re-assembled. My friend Lynn suggested to paint the door inlay with the same colour of yellow as in the background of the Iris tile. Genius!


With the flip top hinged lid on the top box, small drawer, and roomy central cupboard - I think it's a really handy piece.


All of my furniture is "wood" look - and this is doesn't match my house style. Lucky my main bathroom is Black and White so I can just get away with it in there. I don't think this is the final spot, but it will do for now. And it's very handy.


A Star is Re-born! (Not me, the washstand!!!!)

Wednesday, February 22, 2012

CRAFTS: Mosaic Bird Bath

Thankyou to those of you who have come over from Rubie's blog to visit me. You are very kind and have nice things to say to support me. Big hugs to you all.

It's been no secret that I love indulging in crafts, and one of my newest (only in the last couple of years - thankyou to Lynn, my friend who first took me with her to classes) is mosaics. There is a lot of satisfaction gained in SMASHING tiles and mirror and such and then putting the bits back together to make something lovely. I also have a good friend who is a ceramics artist (her web site is in my side bar) and I've passed the mosaics "bug" onto her as well. What is great about that relationship - is that we can make and fire all kinds of special small items and ornaments that we include into our pieces. You can see what I mean by checking out some of the selection on her site.

This is a birdbath I made for my brother's birthday....which was last October. I haven't quite been able to let it go because I love it so much, and he is about to do some backyard renos..... so I've used that as the excuse to not hand it over! Aren't I naughty!! My time is running out because he has said something like he "might see it for this years birthday".  Ooops.  Busted!

 First part done - the "bowl".


Finished


Rubie being curious as ever.